We value your privacy

This site uses cookies to improve your browsing experience, analyze site traffic, and show personalized content. See our Privacy Policy.

  1. Guides
  2. Chat in your app
  3. Tutorial

Tutorial: Add Chat to Your App

This tutorial walks you through building a chat-over-data application with MooseStack: an LLM-powered chat UI backed by ClickHouse, with MCP tools for querying your data, and a Next.js frontend where you can build custom dashboards or use a query builder.

By the end of this guide you'll have

Chat UI with MCP-backed data access

A resizable chat panel in your Next.js app, powered by Claude, that queries your ClickHouse data through MCP tools.

MooseStack backend with MCP server

A MooseStack service exposing query_clickhouse and get_data_catalog tools, with bearer token authentication.

Type-safe query layer (optional)

A defineQueryModel-based metrics layer that projects consistent metric definitions to chat, MCP, APIs, and dashboards.

Query builder APIs (optional)

Deterministic REST endpoints powered by buildQuery — no LLM in the loop, same metric definitions as chat and MCP.

Production deployment

Backend deployed on Fiveonefour, frontend on Vercel, with production data loaded and authenticated.

Everything is code: your data models, query layer, MCP tools, and chat configuration all live in your repo, go through PR review, and deploy through your normal CI/CD pipeline. With MooseStack, you iterate locally against a real ClickHouse instance, then deploy to Fiveonefour when you're ready to ship.

Sample data

If you don't have your own data yet, you can use the Amazon Customer Reviews dataset (150M+ rows, no auth required) to follow along.

Want Python Examples?

This guide is written for TypeScript developers, but Python developers can follow along. The concepts translate directly, and MooseStack supports both languages. If you'd like Python-specific examples, let us know in our Slack community and we'll prioritize creating them.

You'll work through:

  1. Project and Dev Harness Setup to initialize your MooseStack project, configure authentication, connect your dev harness, and verify the chat UI runs locally.
  2. Model and Load Data to define your data models and populate ClickHouse.
  3. Test Basic Chat to verify the chat can query your data and customize the system prompt.
  4. Query Layer (optional) to add type-safe metrics that stay consistent across every surface.
  5. Query Builder (optional) to create deterministic REST API endpoints from your query model.
  6. Deploy to Production to ship your backend to Fiveonefour and frontend to Vercel.
AI-assisted Development

We recommend using an AI copilot to accelerate development. However, you can complete every step manually if you prefer. Any AI-enabled editor (Claude Code, Cursor, Codex, Opencode, GitHub Copilot, Windsurf, etc.) will work. Editors that support MCPs can make this workflow even faster.

Project and Dev Harness Setup

Get your project initialized and running locally.

Model and Load Your Data

Define your data models in MooseStack and get data into ClickHouse.

Test Basic Chat with Data Access

Verify that your chat can query your data through the MCP tools.

Query Layer (Optional)

Right now, the chat generates SQL on the fly. That works for exploration, but the moment the same metric lives in chat, an API, a dashboard, and an MCP tool, you have multiple SQL definitions that can drift.

Example: chat generates SUM(amount) for revenue. The dashboard uses sumIf(amount, status = 'completed'). One is wrong. A query layer prevents this by giving every surface the same definition.

It solves two problems:

  1. Consistency: one metric definition, same answer everywhere. No re-implementation per surface.
  2. Safe changes: update a metric once, every consumer stays in sync. The type system catches breaking changes at compile time.

Query layer architecture

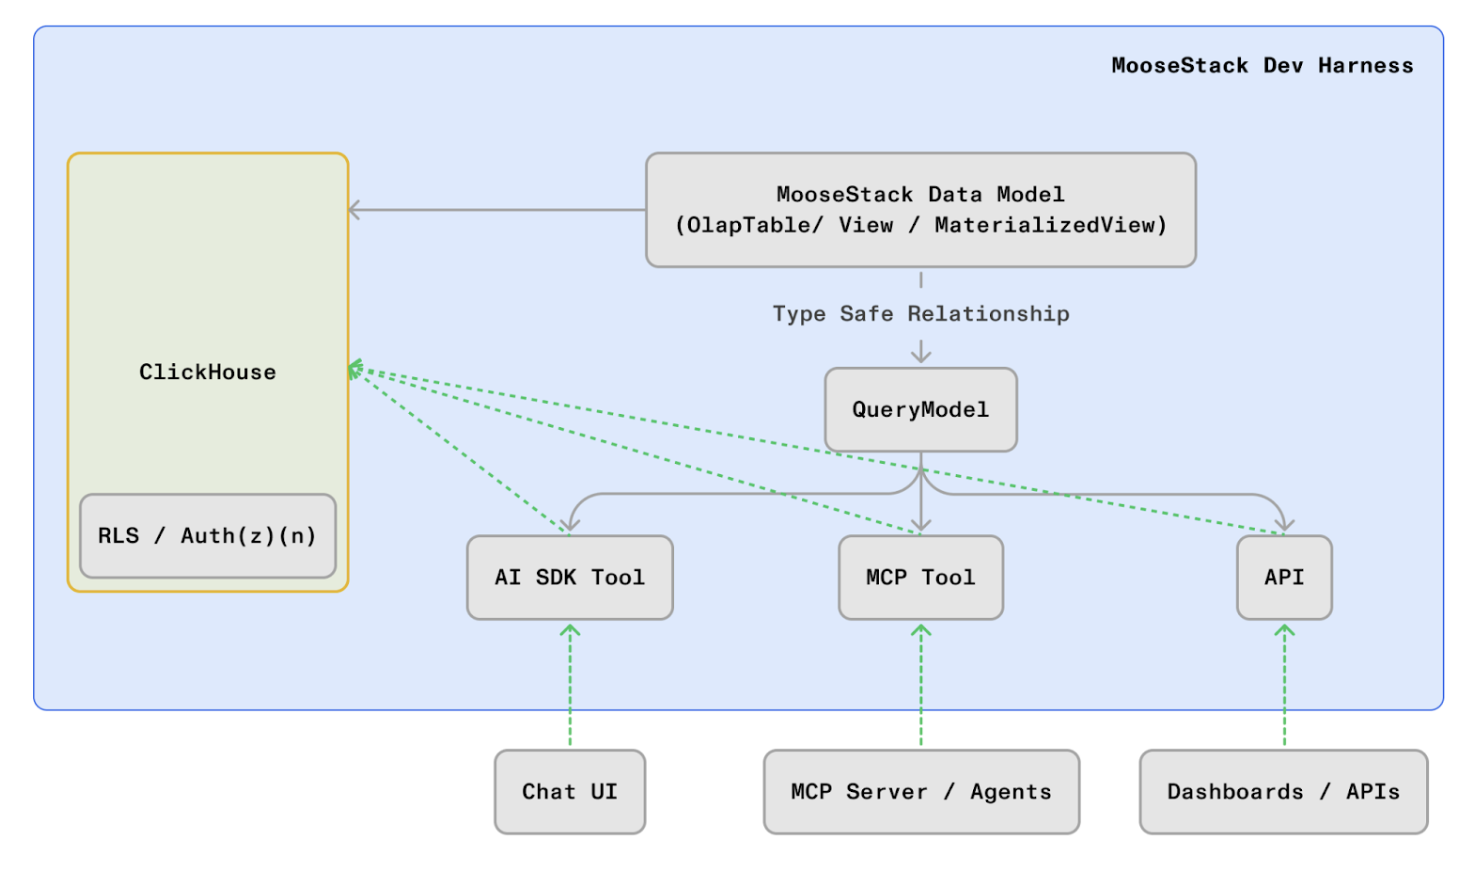
See the query layer docs and Define once, project everywhere for more detail. The steps below walk you through implementing it.

Dashboard and Query Builder (Optional)

Your chat app works — now add visual components. This section covers slotting in dashboard charts powered by your query model, and building a composable query builder for flexible data exploration.

A query builder gives users a point-and-click interface to explore data — select metrics, pick dimensions, apply filters — without writing SQL or relying on an LLM. Because it reads directly from your query model's metadata, any metric or dimension you add to your defineQueryModel automatically appears as an option in the UI. One definition, every surface.

See the query builder docs and the financial demo APIs for working examples.

Deploy to Production

Ship your backend to Fiveonefour and your frontend to Vercel. Both platforms deploy from GitHub, so pushing to your repo triggers builds automatically.

On this page

Project and Dev Harness SetupModel and Load Your DataTest Basic Chat with Data AccessQuery Layer (Optional)Dashboard and Query Builder (Optional)Deploy to Production
Edit this page
FiveonefourFiveonefour
Fiveonefour Docs
MooseStackHostingTemplatesGuides
Release Notes
Source544
  • Improving the Performance of Your Dashboards
  • Chat in your app
    • Overview
    • Tutorial

Step Progress

0 of 2 complete

What you get

  • Configured project with MCP server and chat UI ready to run
  • Dev harness: MooseDev MCP, Context7, Skills, LSP, and agent context files

Workflow

  1. 1

    Prerequisites

    Ensure you have the following installed:

    • Node.js v20+
    • pnpm v8+
    • Docker Desktop (must be running for local development)
    • Claude API key (for chat functionality)
  2. 2

    Install MooseStack and 514 CLIs

    bash -i <(curl -fsSL https://fiveonefour.com/install.sh) moose,514
  3. 3

    Initialize project

  4. 4

    Initialize MooseStack Skills and LSP

    514 agent init

    This sets up MooseStack Skills and the MooseStack LSP, giving your coding agent access to MooseStack-specific actions and language intelligence.

    Dev harness complete

    With moose init and 514 agent init, your development harness is fully set up. Your agent now has access to several skills including data modeling with ClickHouse best practices, performance optimization, and deployment workflows. We'll use the data modeling skill in the next section.

Step Progress

0 of 2 complete

What you need

  • Sample data, schema documentation, or API docs for your data source
  • MooseStack dev server running

What you get

  • Data model defined in MooseStack with OlapTable
  • Tables created in local ClickHouse

Workflow

  1. 1

    Gather sample data and schema context

    Give your coding agent the context it needs to model your data: sample records, schema documentation, data dictionaries, or API response examples. The more context, the better the model.

  2. 2

    Create a data model and OlapTable

    Ask your coding agent to create a data model and OlapTable, and to invoke the ClickHouse Best Practices skill (/moosestack-clickhouse-best-practices) for efficient modeling.

    Key considerations:

    • Typing matters: use tight types, LowCardinality for low-cardinality strings, appropriate numeric precision. See supported types.
    • Order By is critical: the orderBy determines how data is physically stored in ClickHouse. Think about how the data will be queried and filtered.
    • Think about consumption: model with your query patterns in mind. What will you GROUP BY? What will you filter on?

    Make sure the model is exported from your project's index.ts so MooseStack creates the table.

  3. 3

    Verify the tables were created

    The dev server picks up new models automatically. Verify with moose ls or ask your agent to use the infra map MCP tool:

    moose ls

Step Progress

0 of 1 complete

What you need

  • Local ClickHouse populated with data
  • MooseStack and web app running (pnpm dev)

What you get

  • Verified chat experience with real data
  • Understanding of what queries the LLM generates

Workflow

  1. 1

    Chat with your data

    Open http://localhost:3000 and try asking questions about your data. The chat uses MCP tools (query_clickhouse and get_data_catalog) to answer.

    Try a few queries and pay attention to the tool call results — each one shows the SQL that was executed. This will help you identify patterns for the optional query layer later.

  2. 2

    (Optional) Customize the system prompt

    The system prompt shapes how the LLM interacts with your data. Edit it to add domain context, preferred terminology, or query guidelines:

    packages/web-app/src/features/chat/system-prompt.ts

Step Progress

0 of 1 complete

What you need

  • Working MooseStack project with data loaded
  • Familiarity with the queries your chat is running (check chat tool call results)

What you get

  • Type-safe query models with defineQueryModel
  • Consistent metric definitions projected to every surface
  • Constrained chat and MCP tools that use the query model instead of freestyle SQL

Workflow

  1. 1

    Identify query patterns from chat usage

    Before building the query layer, understand what queries your chat is actually running. Review the tool call results in your chat UI — each query_clickhouse call shows the SQL that was executed.

    Look for:

    • Repeated aggregation patterns (e.g., GROUP BY date, COUNT(*))
    • Metrics that should have constraints (e.g., revenue should only count completed transactions)
    • Common filter and grouping combinations

    These patterns become the dimensions, metrics, and filters in your query model.

    Materialized Views for heavy metrics

    For compute-heavy metrics, consider backing your query model with a Materialized View that pre-aggregates data into a serving table. The query model can reference the MV's target table instead of the raw data.

  2. 2

    Define a query model with defineQueryModel

    Ask your coding agent to create the query layer:

    Create a query layer for me to use in defining APIs for a dashboard andtools for chat. Docs: https://docs.fiveonefour.com/moosestack/apis/semantic-layerAPI reference: https://docs.fiveonefour.com/moosestack/reference/query-layerExample App: https://github.com/514-labs/financial-query-layer-demo Make sure to use column references from the OlapTable object in the SQLfragments (e.g. `TransactionTable.columns.totalAmount`).Make sure to use description fields on metrics, dimensions, and filters —these propagate to tool definitions and help the LLM understand what eachmetric means.Make sure to export anything that needs to be exported in index.ts.

    The agent will generate a defineQueryModel with dimensions, metrics, and filters derived from your OlapTable.

  3. 3

    Review the generated query model

    Review the output — you can explicitly define any metric to ensure it matches your business logic. Check that:

    • Dimensions cover the groupings you need (time buckets, categories, etc.)
    • Metrics use the right aggregations — especially constrained metrics like countIf or sumIf
    • Filters expose the right columns and operators for your use cases
    • Column references use YourTable.columns.* (not raw strings) for type safety
    • Descriptions are clear — they propagate to tool definitions and help the LLM
  4. 4

    Use the query model in APIs and tools

    The same query model object can be consumed by every surface. Add a metric to the model, and it becomes available everywhere.

    Try asking your chat a question that uses your query model's metrics and dimensions — the model's tool will be called automatically.

Step Progress

0 of 2 complete

What you need

  • A defineQueryModel from the previous section
  • Your Next.js frontend running

What you get

  • Dashboard charts powered by buildQuery endpoints
  • Visual components that stay in sync with your query model

Workflow

  1. 1

    Add dashboard charts

    Ask your coding agent to build the dashboard:

    Use a shadcn chart to create a"number of reviews over time" chartand a "average rating over time" chart

    Your agent will create the buildQuery API endpoints and chart components for you. Since buildQuery assembles SQL from your query model, the charts stay in sync with your metrics definitions.

    CORS

    If your Next.js frontend and MooseStack service run on different ports, you may hit CORS errors when fetching from these endpoints. See the financial demo middleware for a middleware approach to handle this.

Step Progress

0 of 5 complete

What you need

  • A GitHub account
  • Your project working locally

What you get

  • Your project in a GitHub repo, ready for deployment

Workflow

  1. 1

    Push your project to GitHub

    Create a new repo on GitHub and push your project:

    git init
    git add .
    git commit -m "Initial commit"
    git remote add origin https://github.com/<your-username>/<your-repo>.git
    git push -u origin main

    Both Fiveonefour and Vercel will deploy from this repo.